
Home Producer Lab: MIDI drums, Part 2 of 3 Part 1: MIDI drum basics · Part 2: Arranging (you’re here) · Part 3: Producing and mixing MIDI drums
Key takeaways
- Write different drum parts for each section of the song. A loop is a starting point, not a drum track.
- Respect drummer anatomy: two hands, two feet. Parts a drummer couldn’t play sound wrong even if you can’t say why.
- Vary hi-hat and snare velocities. Identical hits are the biggest giveaway of programmed drums.
- Quantize sparingly, if at all. Timing feel is the thing you can’t easily put back.
A drum loop is not a drum track.
A loop is a great starting point. It gives you a groove, a feel, and something to write against. But copy the same two bars across a whole song and the listener will eventually notice. Or worse, they won’t notice anything at all, because nothing ever changes.
A real drummer reacts to the song. They play differently in the verse and the chorus, leave space, build energy and set up transitions. This post is about doing the same with MIDI: turning loops into a full, believable drum arrangement. No drummer required, but we’ll borrow a little drummer logic.
From drum loop to drum performance
A drum loop is not a drum track.
A loop can be a great starting point. It gives you a groove, a feel, and something to write against. But if you copy the same two bars across an entire song, the listener will eventually notice.
Or worse, they won’t notice anything at all because the track never changes.
A real drummer reacts to the song. They play differently in the verse, chorus, bridge, intro, outro, and breakdown. They add small variations. They leave space. They build energy. They set up transitions.
That’s what this post is about: turning MIDI drum loops into full, believable drum arrangements.
No drummer required, but we do need to borrow a little drummer logic.
Start with the song
Before you touch the drums, listen to the song and decide what it needs. Ask yourself:
- What’s the main feel? Should the drums push forward or sit back?
- Where does the song need energy, and where does it need space?
- What’s the bass doing?
- What should happen when the chorus arrives?
Drums aren’t just a rhythm grid; they shape the emotional movement of the track. A good drum part supports the song. A bad one competes with it. A really bad one sounds like someone kicked a toolbox down a staircase and then added reverb.
Think like a drummer: two hands, two feet
The most important rule in MIDI drum arrangement is that a real drummer has two hands and two feet. Unless you’re writing for an octopus, your parts should respect that.
A common beginner mistake is stacking a crash, hi-hat, snare and ride on the same beat. It looks powerful in the piano roll, but it sounds slightly wrong, because nobody could actually play it.
A few habits fix most of this:
- When you add a crash, take out the hi-hat or ride note that hand would have played. (The other hand can sometimes keep the hat going, but only if it isn’t busy on the snare.)
- When you write a tom fill, thin out or drop the hi-hat. Both hands are on the toms.
- When you switch to the ride, let the hi-hat drop out or become a foot “chick” on the pedal.
This one habit makes MIDI drums sound much more believable.
Build sections, not just patterns
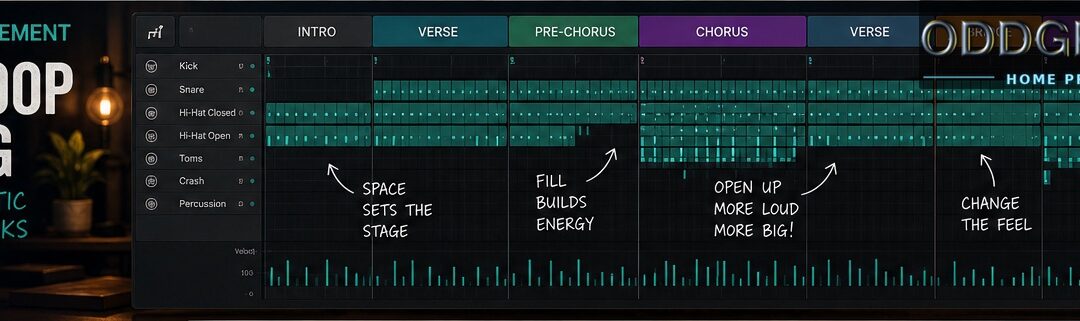
Most songs need a different drum part for each section, and the easiest way to think about it is energy. Here’s a typical shape. Treat it as a menu, not a rulebook.
Intro
The intro doesn’t need the full groove. Try kick only, hi-hat only, toms, a light version of the main groove, cymbal swells, or no drums at all. Don’t be afraid of making the drums wait. When they do come in, it means more.
Verse
The verse usually needs space for the vocal or lead. Try closed hi-hats, lighter snare hits, a simpler kick pattern and fewer crashes. A good verse groove supports the song without announcing, “Look at me, I own three ride cymbals.”
Pre-chorus
The pre-chorus builds energy. Add lift by opening the hi-hat slightly, raising velocities, adding snare pickups, making the kick busier, or moving from tight hats to a wider cymbal sound, then finish with a small fill into the chorus.
Chorus
The chorus usually needs more weight and width: stronger backbeats, a crash on the downbeat, ride or open hi-hat, a slightly busier kick, and stronger velocities overall. “Bigger” doesn’t have to mean crudely louder. It means more open and more confident. (The mix side of a bigger chorus, room mics and parallel compression, is covered in Part 3.)
Bridge
The bridge is your chance to change the texture: a half-time feel, toms, sidestick, ride bell, sparse kick and snare, or percussion. Give the listener a new angle before returning to the main idea.
Outro
The outro can either build or wind down: extra fills, open hats and the ride, or a stripped-back groove. Whichever you choose, do it on purpose. Don’t just let the loop run until the song ends and everyone quietly leaves.
Make hi-hats feel human
Hi-hats are one of the biggest giveaways in programmed drums. The classic stiff pattern is eight identical closed hi-hat hits per bar, perfectly on the grid, all at the same velocity. Technically that’s a groove. Emotionally, it’s a printer test page.
A real drummer varies the dynamics constantly. For a basic eighth-note pattern in 4/4 (“1 and 2 and 3 and 4 and”), accent the beats and soften the “ands”. Here are some starting values:
| Hit | Starting velocity |
|---|---|
| Accents (e.g. beat 1, or the start of a phrase) | 100–115 |
| Beats (1, 2, 3, 4) | 80–95 |
| Offbeats (“and”) | 50–70 |
| Occasional extra-soft notes | 35–50 |
Treat these as starting points. Every sampler responds to velocity differently, so adjust by ear. (New to velocity? Part 1 explains how it works.)
Articulations help too. Most libraries offer some of these, though the names and conventions vary:
- tighter, softer “tip” hits for quiet notes, “edge” hits for accents
- a slightly open hat leading into a chorus
- an open hat at the end of a phrase
- a pedal chick when the hand leaves the hi-hat for a crash or fill
Don’t randomize everything wildly, though. Human feel is controlled imperfection, not chaos.
Use ghost notes with taste
Ghost notes are very quiet snare hits between the main backbeats. They give a groove motion and depth, especially in funk, soul, R&B, blues and prog.
The key is the difference in level. As a starting point, put backbeats around 95–120 and ghost notes around 20–50, then adjust for your sampler. If your ghost notes are as loud as the backbeat, they’re not ghost notes anymore. They’re regular notes wearing a sheet and hoping nobody notices.
Leave space between them, too. Too many ghost notes make the drummer sound nervous.
Write fills that lead somewhere
A fill is a transition. Its job is to move the song from one section to the next, not to show off. Before writing one, ask what it’s for: entering a chorus, leaving a verse, setting up a stop, building tension, or changing the feel.
Simple fills often work best:
- a snare pickup before the chorus
- a short tom fill at the end of a verse
- a kick-and-snare push into a downbeat
- a one-beat pause before a big entrance
- a crash on the first beat of the new section
And remember the anatomy rule: during a two-handed tom fill, the hi-hat stops. Fills should sound playable, not like a drum kit being pushed out of a van.
Should you quantize MIDI drums?
Sometimes, but sparingly. Quantizing snaps notes to the grid. It can tighten a sloppy performance, but it can also flatten exactly the timing feel that makes drums sound human, and that’s very hard to put back.
If you do quantize, try:
- quantizing only the kick and snare, and leaving the hi-hats looser
- partial quantizing (often called “strength”, e.g. 50%), which moves notes only part of the way to the grid
- groove quantizing to a feel instead of a straight grid (see below)
- fixing only the notes that actually sound wrong
The piano roll can be misleading. A note can look late and feel great, and another can look perfect and sound stiff. Judge it with the bass and the rest of the band playing.
One extra tip: if you’re using grooves that were played by a real drummer, don’t quantize them at all. At OddGrooves we never quantize Magnus’s grooves, because his timing is the product. Snap them to the grid and you’ve thrown away the part you paid for.
Use groove templates
A groove template takes the timing feel of one performance and applies it to another part. For example, you can take the push and pull from a live-played drum groove and apply it to a programmed part, or to your bass and keys.
That last trick is underrated. Drums, bass, rhythm guitar and keys should sound like they’re in the same band, not like they met five minutes before the session. Most DAWs can do this: Logic has Make Groove Template, Cubase can create a Groove Quantize preset from a MIDI part, and Ableton has Extract Groove.
A live-recorded MIDI groove makes a great source for a template, since the feel comes from a real drummer rather than a randomizer. Use it gently, though. Too much groove processing can start to feel artificial too.
Understand swing
Swing delays the offbeats. In straight eighths the notes are evenly spaced; in swung eighths every second note arrives late, giving a triplet-like lilt. A little swing can make a groove more relaxed, funkier, bluesier or more old-school. Too much makes the track wobble.
Adjust swing with the whole song playing. The right amount depends on the music, not the number on the screen. For a feel that’s hard to dial in with a swing knob, like a 16th-note shuffle, it’s often easier to start from a groove that was played that way. Our Funky Drumming 2: The Bumpy Pack is built entirely around that feel.
Use MIDI grooves as raw material
Ready-made MIDI grooves give you real-feeling performances, fills and dynamics without programming every hit, which is especially helpful if you’re not a drummer. But don’t just drag in a loop and call it done. Edit it for the song: change the kick to lock with the bass, thin out ghost notes under the vocal, choose different crash and ride moments, swap fills, and adjust velocities between sections.
Think of it as working with a drummer who’s given you a take. You still get to produce it.
That’s exactly how we build our packs. Magnus Brandell records every groove live, and most packs come arranged as song sections (intros, verses, choruses, bridges, fills), so you’re arranging with a real drummer’s parts instead of a single loop. Recently I wanted to test that, so I loaded the Fusion Drumming pack in Addictive Drums 2 and tried building a modern pop track from it. About 32 minutes later I had a Latin-tinged pop verse and a surprisingly hooky chorus. You can hear the result as the first clip on the Fusion Drumming page.
Want to try arranging with real drummer parts? Download 242 free MIDI drum grooves and use them to practise everything in this post.
Make loops come alive
Even within a section, add small changes every few bars:
- change the last bar of a four-bar phrase
- add a small fill every eight bars
- drop one kick before a new section
- open the hi-hat slightly on the last offbeat
- simplify the groove under the vocal
The goal is natural movement, not constant change. Real drummers repeat themselves, but not like a copy-paste command with self-esteem issues.
Common MIDI drum arrangement mistakes
No contrast between sections. Use velocity, cymbal choice, how busy the part is, and ambience to make the chorus feel different from the verse.
One loop for the whole song. Even a great loop gets boring. Write section variations.
Too many crashes. Crashes are punctuation, and not every sentence needs five exclamation marks. Save them for important moments.
Impossible parts. If one hand is playing crash, ride, hi-hat and toms at once, simplify.
Fills that are too busy. A fill should lead into the next section, not explain the drummer’s entire personality.
FAQ: MIDI drum arrangement
How do I arrange MIDI drums for a full song?
Write a different drum part for each section rather than looping one pattern. Keep verses simpler to leave room for the vocal, build energy in the pre-chorus, open up the chorus with stronger backbeats and cymbals, change texture in the bridge, and use short fills to link sections. Add small variations every four to eight bars.
Why do my MIDI drums sound robotic?
Usually because every hit has the same velocity, every note sits exactly on the grid, and the same pattern repeats with no variation. Vary hi-hat and snare velocities, quantize less (or not at all), keep parts physically playable, and change something every few bars. Starting from grooves played by a real drummer solves most of this.
What velocity should hi-hats be in MIDI?
A good starting point for eighth-note hi-hats in 4/4 is around 100–115 for accents, 80–95 for the beats, 50–70 for the offbeats, and 35–50 for occasional softer notes. Every sampler responds differently, so use these as starting values and adjust by ear in the context of the song.
What velocity should ghost notes be?
Start ghost notes around 20–50 and backbeats around 95–120, then adjust for your sampler. What matters most is the gap: ghost notes should be felt rather than clearly heard. If they’re close to backbeat level, they stop sounding like ghost notes and make the groove sound busy and nervous.
How much should I quantize MIDI drums?
As little as possible. Try quantizing only the kick and snare, use partial quantize strength (around 50%), or groove-quantize to a live feel instead of a straight grid. Grooves played by a real drummer shouldn’t be quantized at all, because their timing feel is what makes them sound real.
What is a groove template?
A groove template captures the timing feel of one performance and applies it to other MIDI parts. You can, for example, take the feel of a live-played drum groove and apply it to programmed drums, bass or keys so the whole track shares the same push and pull. Logic, Cubase and Ableton all include tools for this.
How do I write better drum fills?
Decide what the fill is for: entering a chorus, setting up a stop, building tension. Then keep it simple and playable: a snare pickup, a short tom run or a kick-and-snare push often works best. Remove hi-hat and ride notes when both hands move to the toms, and land the fill with a crash on the next downbeat.
Are MIDI drum grooves good enough for real songs?
Yes. MIDI grooves played by a professional drummer are used on plenty of released music. The trick is to treat them like a session take: choose grooves for each section, edit kick patterns and fills to fit your bass line and vocal, and adjust velocities so the drums follow the song’s dynamics.
Final thoughts
A realistic drum arrangement isn’t about filling every gap. It’s about movement, contrast and musical logic: think like a drummer, build sections, vary the hi-hats, use ghost notes with taste, write fills that lead somewhere, and don’t quantize the life out of it.
Most of all, make the drums serve the song. Not the piano roll. The song.
Want a head start? Grab 242 free MIDI grooves played by Magnus and try arranging them into your next track.
Previous: Part 1: MIDI Drum Basics for Non-Drummers Up next: Part 3: How to Produce and Mix MIDI Drums